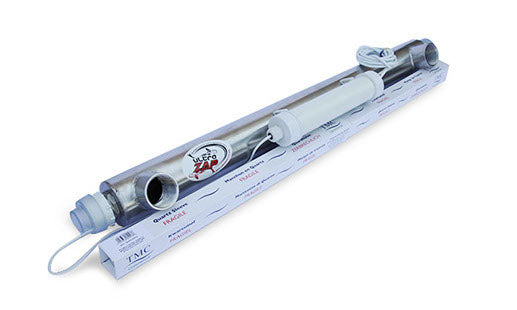
Ultrazap Professional Range UV c/w Quartz Sleeve
Ultrazap Professional Range UV c/w Quartz Sleeve
Fast Shipping
Quality Products
Affordable Price
Reach out to us on ''available to order'' items via WhatsApp or email
Available to order
Couldn't load pickup availability

Ultrazap Professional Range UV c/w Quartz Sleeve

The professional range is used for aquarium, marine, salt water applications. It sterilizes water killing bacteria and viruses.

This range is more durable, used in bottling plants and on irrigation systems. The stainless steel is more sterile and there is no glue to contaminate the water. The stainless steel range gets a high quality Quartz sleeve that is mounted inside the unit. This Quartz sleeve isolates the lamp form the water, allowing the lamp to reach optimum operating temperature.
Replacing the tube in units with a Quartz sleeve
- Disconnect the unit from the power supply, remove clear end caps and gently pull the electrical connectors off the ends of the tube.
- Remove the tube from the Quartz sleeve.
- To install the new tube just reverse the above procedure.
- Removing the Quartz sleeve.
- The quartz sleeve should be inspected every two to three months as dirt build up or calcification can occur. This will affect the efficiency of the U.V. unit.
- Follow the above steps to remove the tube.
- Unscrew the blue nuts and remove the O-rings.
- Gently remove the Quartz sleeve and inspect.
- If the Quartz sleeve needs cleaning use soapy water or a plastic kettle de-scaler.
- Dry the quartz sleeve and re-install sleeve and tube.
- Do not over tighten blue nuts
- Check for leaks before turning the U.V. power on.
Safety
U.V. light can be harmful to your eyes or skin. NEVER operate a tube outside the unit. A blue glow will be seen through the clear end caps and the will confirm the tube is on, the U.V. content of this light is not harmful and the unit is completely safe in normal use.
Installing the Quartz sleeve and tube on a Professional UV
Follow the below steps to install the quartz sleeve and tube
- Unscrew the blue nuts and remove the O-rings
- Gently insert the quartz sleeve into the UV unit.
- Fit the o-rings to the outside of each end of the quartz sleeve
- Gently insert the tube inside the quartz sleeve
- Screw the blue nuts onto the ends until it fits snug onto the o-ring whilst ensuring not to over tighten the quartz sleeve.
- Connect the tube connectors to the ends of the tube and fit the clear PVC covers onto to blue nuts.
- Replacing the tube in units with a Quartz sleeve.
- Disconnect the unit from the power supply, remove clear end caps and gently pull the electrical connectors off the ends of the tube.
- Remove the tube from the Quartz sleeve.
- To install the new tube just reverse the above procedure
Safety
U.V. light can be harmful to your eyes or skin. NEVER operate a tube outside the unit. A blue glow will be seen through the clear end caps and the will confirm the tube is on, the U.V. content of this light is not harmful and the unit is completely safe in normal use.
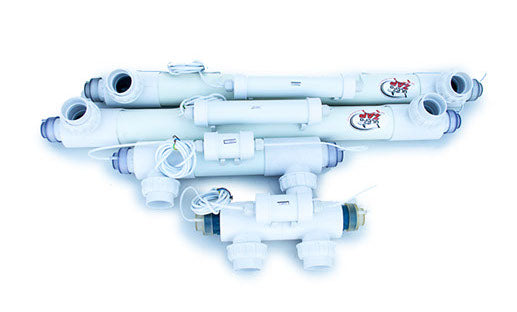
Installing UV sterilisers to a manifold
- Follow the below steps to install the UV’s to a manifold.
- On a 4 way manifold you will need 2 manifolds and 4 UV’s
- Line the 4 UV’s up next to each other and place a manifold at each end.
- Insure that the O-rings are in place inside the half unions on each manifold
- Once certain that none are missing begin fitting each manifold to the respective end of the UV’s
- Effectively you will now have 1 inlet and 1 outlet with the four UV’s in between
- Please note that the complete unit must be installed with the lids of the electrical boxes facing skywards.
- For 55W pond UV’s the effective maximum flow rate is 1200L/min
- For 55W professional UV’s the effective maximum flow rate is 600L/min
Safety
U.V. light can be harmful to your eyes or skin. NEVER operate a tube outside the unit. A blue glow will be seen through the clear end caps and the will confirm the tube is on, the U.V. content of this light is not harmful and the unit is completely safe in normal use.